Keycloak OpenID connect authentication allows users to log in to Forgejo using their Keycloak credentials. This article explains how to set up Keycloak as an authentication provider in Forgejo.
Authentication
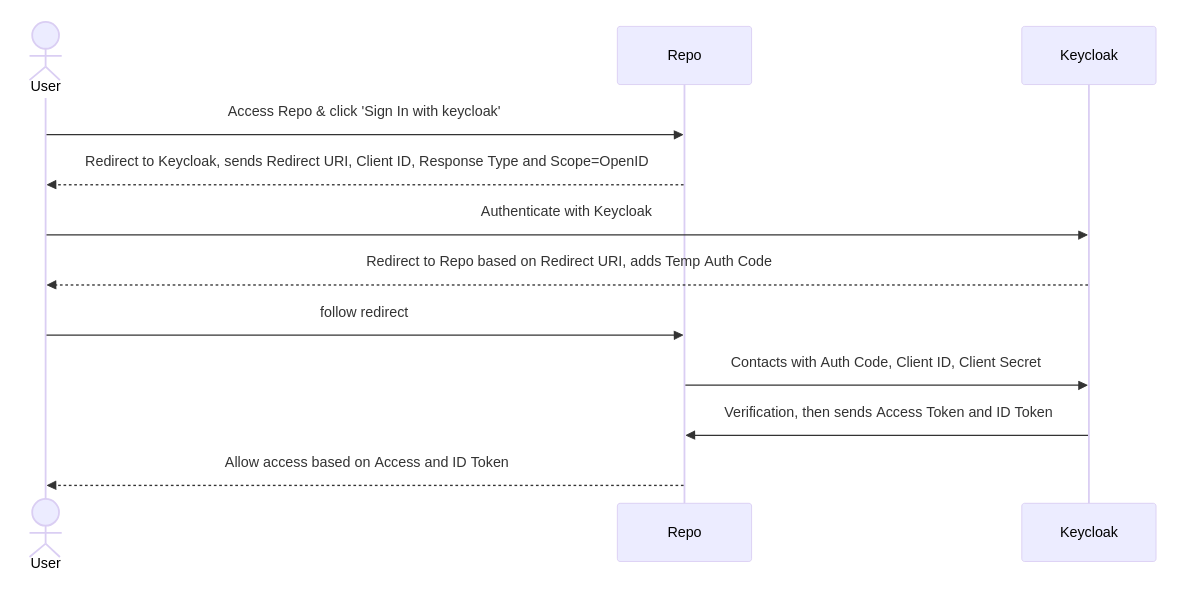
First use case to integrate is authentication. Authentication tells the integrated Forgejo who the user is. Under the hood this will login existing users and in addition register unknown ones.
Keycloak: Setup Client
We will setup the keycloak client Forgejo will connect to.
- login as realm admin (for keycloak newbies
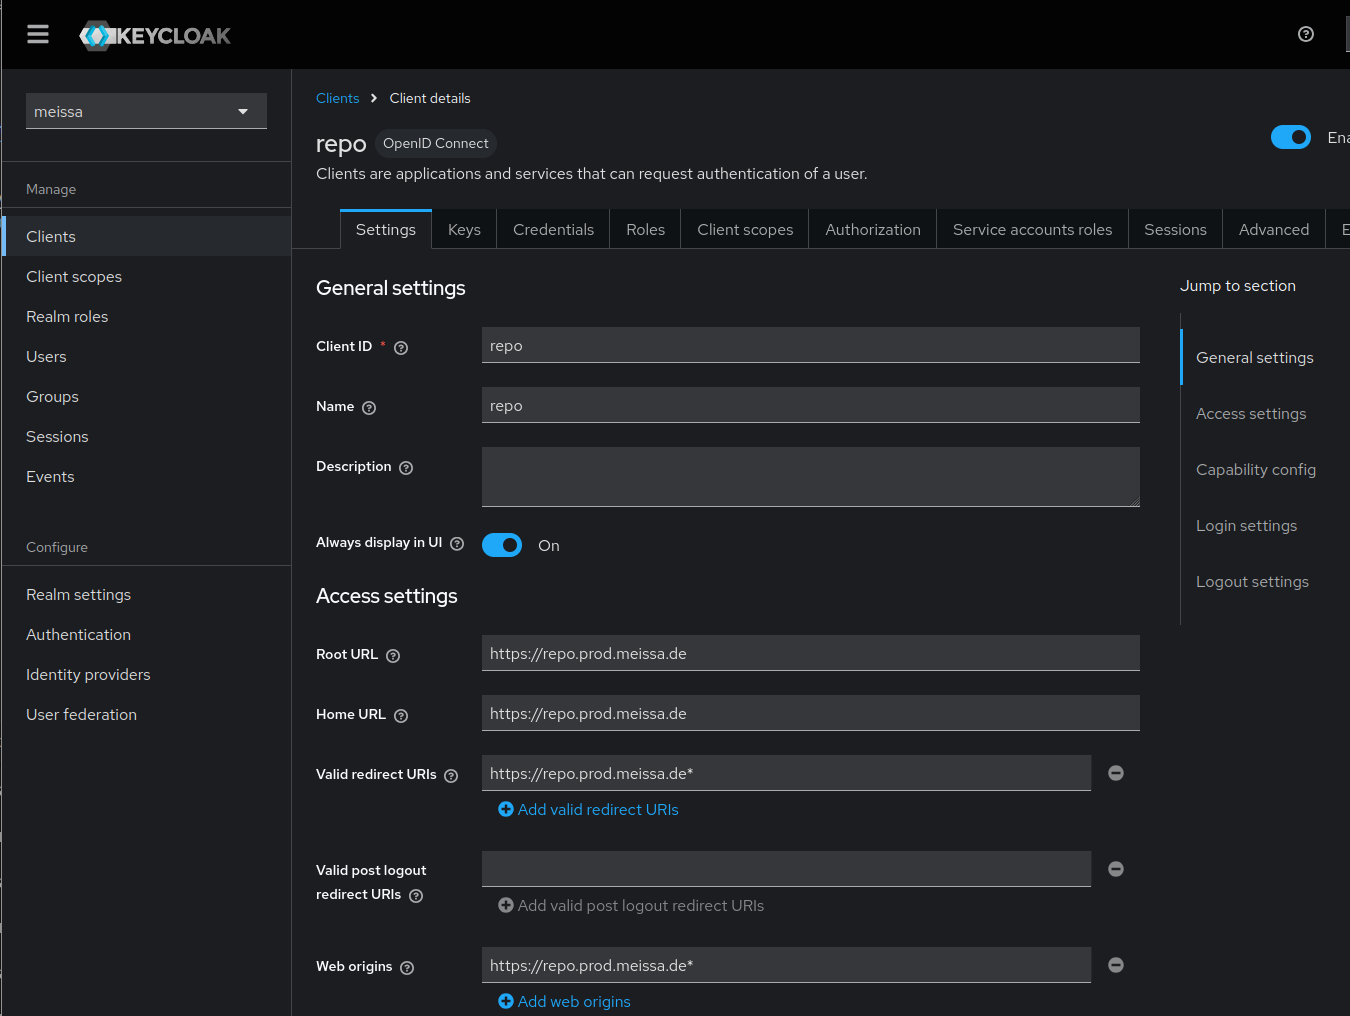
https://[your.keycloak.server]/admin/[your-realm]/consoleis a good guess) - create forgejo-client
- Client ID:
repo - Client authentication:
on - Root URL:
[https://your.forgejo.server] - Home URL:
[https://your.forgejo.server] - Valid Redirect URLs:
[https://your.forgejo.server]*
- Client ID:
Forgejo: Setup Authentication Source
In Forgejo we now can setup an authentication source and connect to the keycloak client.
- login as Forgejo admin
- navigate to Site administration -> Identity & access -> Authentication sources
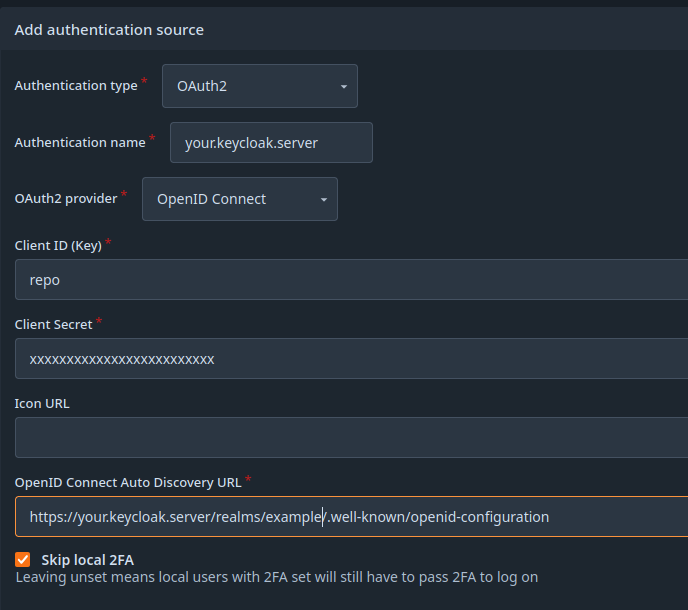
- Add authentication source
- for
Authentication typechoose OAuth2 - for
OAuth2 providerchoose OpenID connect - Client ID:
repo - copy Client secret from keycloak to Forgejo
- enter the OpenID Connect Auto Discovery URL:
https://[your.keycloak.server]/realms/[your-realm]/.well-known/openid-configuration - Skip local 2FA:
on
Authorization by Role
You can define a role to decide whether users are denied / allowed to access Forgejo.
Keycloak: Configure Client Role
For authorization we will now setup a client role in keycloak.
- navigate to your forgejo-client -> Roles
- Create role lets call it
repo - navigate Client Scopes -> repo-dedicated
- Add mapper -> Add predefined mapper -> choose
client rolesto add. - enter
- Name: on your choice
- Token Claim Name:
roles - Add this informations to tokens: (see image)

Forgejo: Authorize Access by Role
On Forgejo side we allow access only if the user authenticated has the client role assigned.
- navigate to Authentication source created above.
- set Required claim name:
roles - set Required claim value:
repo
- set Required claim name:

Sync org & team
You can also sync organization and team memberships. In our example this is based on group membership in keycloak.
Keycloak: Setup Group Mapping
-
navigate to Client scopes
-
create a new client scope
- set Name to e.g.
groups - leave Type at
None Save
- set Name to e.g.
-
click Mappers
- click Configure a new mapper
- click Group Membership
- set Name to e.g.
groups - set Token Claim Name to e.g.
groups. This is a value, that needs to be set in Forgejo. - unset Full group path. For our example we use the plain group names.
- make sure Add to ID token, Add to access token, Add to userinfo are set.
Save

-
go to Groups
- sreate groups and respective sub-groups. The group names need to be set in Forgejo
- add users to their respective group/sub-groups. The users will be added to teams of the same name in existing organizations in Forgejo.
-
go to Clients
- select the client created above.
- select Client scopes
- click Add client scope
- select the client scope you created e.g.
groups - click Add & select
Default. Default will add the mapped information in the default token.


Forgejo: Configure Group to Organization Mapping
In Forgejo we now will define a mapping from keycloak group to Forgejo organization.
- navigate to Authentication source created above.
- set Claim name providing group names for this source. (Optional). Must be the same as
Token Claim Name - set Group claim value for administrator users. if desired. Must be the name of the keycloak group you defined to be administrator group.
- set Group claim value for restricted users if desired. Must be the name you chose for the restricted access in keycloak.
- add the mapping in Map claimed groups to organization teams.. The mapping might look like
{"staff": {"internal-org": ["Staff"], "public-org": ["Staff"]}, "external": {"internal-org": ["Contributor"], "public-org": ["Contributor"]}, "your-customer1": {"customer-org": ["Staff"]}} - optional: Check the Remove users from synchronized teams if user does not belong to corresponding group. box for synchronized teams. This will remove users from a role / team if they are removed on keycloak side. Be careful! If you screw up your mapping, the role- and team-membership will also be removed.
- set Claim name providing group names for this source. (Optional). Must be the same as

The sync is done on next user login or session renew.
Logout Integration
At the moment there is no Single Logout implemented. That means
- if a logged in user presses logout in Forgejo, Forgejo will not inform keycloak about the logout.
- if user logs out in an other application keycloak can not signal Forgejo user has logged out. To reduce the impact you may configure a short session timeout:
[session]
SESSION_LIFE_TIME = 3600